LUFA Prog

|
Yet another LUFA-based programmer? Yes, it all started with another new programmer (also LUFA-based) broken at its very first use... So a new design developed with robustness and better parameters in mind appeared.
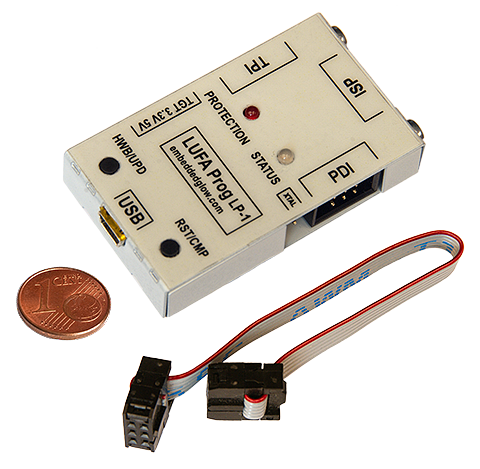
LUFA PROG is AVR programmer. As the name shows it is powered by LUFA – that's the well known AVRISP-MKII Clone project by Dean Camera that emulates AVRISP-MKII functionality but working on slightly different than usual hardware. The device allows programming of the entire 8-bit AVR range via ISP 6-pin as well as the PDI (XMEGA) and TPI (TINY). It works with AVR/Atmel Studio(4) 4, 5 and 6.1 in Windows, Avrdude 5.10 and above in Linux and avrdude in crosspack under OSX.
What the new programmer has to offer:
- Target supply voltage selectable between programmer-supplied regulated 5 V(1) and 3.3 V (target must be 5 V or 3.3 V tolerant!!) or target-supplied (VTARGET);
-
Big target supply current up to 500 mA(2) (if allowed by PC USB port, see the note below);
-
Fast and robust protection for the target device and the PC USB port by industry-standard load switch:
-
Overcurrent protection at 500 mA;
-
Short-circuit protection;
-
Undervoltage protection (under-voltage lockout UVLO);
-
Reverse-current protection;
-
Small protection activation time of approx. 7 ms contrary to typical polyfuse trip time of 1 s to 10 s;
-
Visual LED indication for protection status (PROTECTION);
-
-
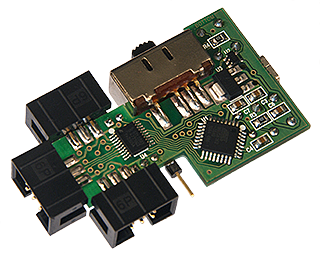
Automatic signal level compatibility for targets between 1.5 V and 5 V (GTL2003 chip);
-
Relatively low voltage drop(3) for the 5 V programmer-supplied target voltage thanks to the low resistance of the target voltage supply circuitry in opposite to the significantly bigger voltage drop on polyfuses;
-
USB updateable firmware;
-
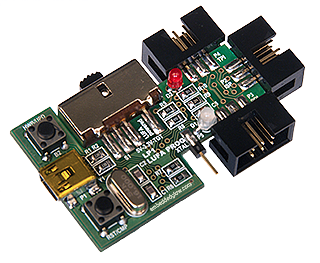
Separate full-sized Reset (RST/CMP) and HWB (HWB/UPD) buttons allowing the use of AVRISP-MKII Clone's RESET_TOGGLES_LIBUSB_COMPAT feature which allows easy switching by button press between Jungo and libUSB driver compatibility modes (Atmel Studio/AVR Studio and avrdude) and of course updating the firmware. Buttons are protected from accidental pressing and double-marked with common AVR symbols for more intuitive use;
-
Bi-color LED for mode and connection status indication (STATUS);
-
Mini USB 5-pin connector;
-
Standard 6-pin target connector;
-
Robust full-sized slide switch for selecting target supply voltage protected from accidental switching;
-
Strong laser-cut metal case;
-
Very compact size;
-
Easily accessible header for the ISP Rescue Clock signal – no need of case opening and soldering;
-
Full compatibility with the AVRISP-MKII Clone.
 |
 |
 |
Of course all the features of the great LUFA AVRISP-MKII Clone still count:
-
ISP, PDI and TPI protocols supported;
-
4MHz ISP Rescue Clock for incorrectly set system clock fuses – available without opening the case from dedicated header (XTAL);
-
Fast, native USB operation;
-
Works on any USB AVR model;
-
Works with anything the official AVRISP-MKII works with (e.g. AVRStudio 4.x and 5.x, Atmel Studio up to 6.1(4)).
|
Notes: |
1. |
5 V supply voltage depends entirely on PC USB port. Practice shows that this voltage sometimes is less than 5 V; |
|
2. |
The supply current offered to the target device depends entirely on the PC USB port where the programmer is connected to. As per USB specifications when any device is initially connected it is considered a low-power device allowed to draw maximum of 100 mA. During the enumeration process the device may ask its current limit to be increased by the host to 500 mA. This depends on the .MaxPowerConsumption descriptor. It is up to the host if additional power will be available so until allowed the device should draw no more than 100 mA. The AVRISP-MKII clone firmware announces 100 mA consumption (descriptors.c). Practice shows though that most PC USB ports can safely provide currents of up to 500 mA without special request that's why LUFA Prog's circuitry is designed for 500 mA; |
|
|
3. |
Voltage drop on the 5 V programmer-supplied line is around 100 mV – around 4.9 V supplied to the target if 5 V is selected. |
|
|
4. |
4 Sep 2014, FW 140302 and probably lower: Atmel Studio 6.2 issues "Tool connect failed" error (StatusCode: 131118) when trying to connect to the programmer. Lower versions work fine. While this issue is not resolved in new firmware, please use Atmel Studio version up to 6.1! |
CONNECTOR PINOUTS
The programmer can be used with any type of AVR supporting ISP, PDI and TPI interfaces. The programming interface is selected by plugging the supplied interface cable into the corresponding connector: PDI for XMEGA chips, TPI for TINY chips and ISP 6-pin for the rest. Connector pinouts are different for each type of interface:
| ISP | PDI | TPI | XTAL | |||||||||||||||
| 1 | 2 | 1 | 2 | 1 | 2 | 1 | ||||||||||||
| MISO | ■ | ● | VTG | DATA | ■ | ● | VTG | DATA | ■ | ● | VCC | R. CLOCK | ■ | |||||
| CLOCK | ● | ● | MOSI | NC | ● | ● | NC | CLOCK | ● | ● | NC | |||||||
| RESET | ● | ● | GND | CLOCK | ● | ● | GND | RESET | ● | ● | GND | |||||||
 |
 |
FIRST TIME INSTALLATION – Windows®
-
Connect the programmer to any PC USB port using normal type-A to mini-USB-5-pin cable – it should be recognized as AVRISP mkII without supplying a driver. This is valid if the programmer is in Jungo mode. If the firmware is compiled with the RESET_TOGGLES_LIBUSB_COMPAT option this mode is indicated by two yellow blinks of the status LED (STATUS) when the USB interface is connected;
-
In AVR/Atmel Studio the AVRISP mkII should be selected in the configuration dialog.
LED INDICATORS
The bi-color STATUS LED shows the status of the programmer:
-
Constant red – No driver or bad driver installed or PC off;
-
Constant green – Ready;
Tip: If the light remains red or yellow after PC is brought to normal state reconnect the programmer;
-
Constant yellow – Writing to target;
-
2 yellow blinks at strartup – Jungo mode;
-
4 yellow blinks at strartup – libUSB mode;
-
Off – disconnected or firmware update mode.
The red PROTECTION LED shows the target protection status:
-
Off – normal operation;
-
Red – target protection activated.
| Note: | If it is not possible to enter programming mode please LOWER YOUR INTERFACE CLOCK until all functions are useable! 2 MHz ISP clock not always works with a 8 MHz devise for example although the ISP clock is exactly 1/4 of the device clock. |
CHANGING COMPATABILITY MODE
If the firmware is compiled with the RESET_TOGGLES_LIBUSB_COMPAT token enabled pressing the RST/CMP button while connected toggles programmer's mode between Jungo and libUSB compatibility. The Jungo mode is then indicated by two yellow blinks of the STATUS LED at startup and the libUSb mode – by four yellow blinks of the same LED at startup.
COMPILING FIRMWARE
Firmware is open-source and can be downloaded from the LUFA page. After downloading the entire package the firmware is available under LUFA-xxxxxx\Projects\AVRISP-MKII. It is suggested to use the latest available firmware.
Before compiling AT90USB162 must be selected as target device. Equivalent parameter is MCU=at90usb162. The CPU frequency parameter has to be F_CPU=16000000.
Optionally configuration tokens can be enabled/disabled. They are available under LUFA-xxxxxx\Projects\AVRISP-MKII\Config\AppConfig.h.
UPDATING FIRMWARE
After successful compilation the resulting .hex file has to be programmed into the programmer via the USB interface. To update the firmware the programmer has to be put in programming mode, i.e. bootloader activated – please follow these steps:
-
When the USB interface is connected using a fingernail or tipped object press and hold the RST/CMP button, then press and hold the HWB/UPD button, then release the RST/CMP button and finally release the HWB/UPD button;
-
Existing AVRISP mkII device should disappear, the STATUS LED should go off and a new AT90USB162 device should be recognized;
-
Start your programming software, set target device AT90USB162 and establish connection;
-
Program the .hex file.
|
Note: |
In rare cases when using FLIP it may fail at writing the new firmware - shut down your computer, start it and try again. |
DEFAULT FIRMWARE OPTIONS
The programmer is shipped with following firmware options enabled:
-
RESET_TOGGLES_LIBUSB_COMPAT – Changing compatibility mode by button enabled;
-
XCK_RESCUE_CLOCK_ENABLE – 4 MHz rescue clock enabled.
DOWNLOADS
MAINTENANCE
Please do not use solvents for cleaning the programmer – use wet cloth instead.


